VuCC VU+ Control Centre Version 0.2 Beta by Lee Hudson

>>Artorius<<

>>English Admin<<
VUCC1.jpg
VUCC5.jpg
VUCC4.jpg
VUCC3.jpg
VUCC2.jpg
VU+ Control Centre Version 0.2 Beta by Lee Hudson

--------------------------------------------------------------------------
A quick VuCC Video guide is available on Youtube
--------------------------------------------------------------------------

Installation Instructions
------------------------------------
Unzip all the files and folders in the zip file to your local hard drive.


How to Use VUCC
-----------------------------
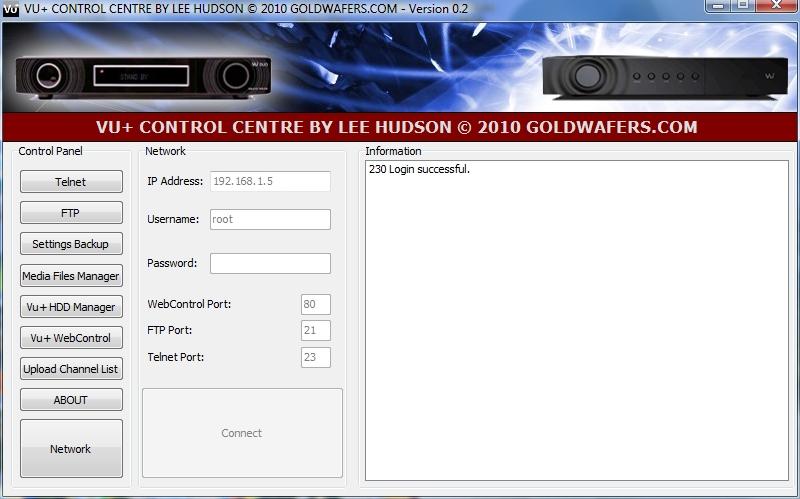
1. Run the VUCC.exe application.
2. Enter the IP address of your Vu+ in the IP Address field, example 192.168.1.5
3. If you have changed the password on your receiver, enter the password in the password field
otherwise leave blank.
4. Click Connect Button


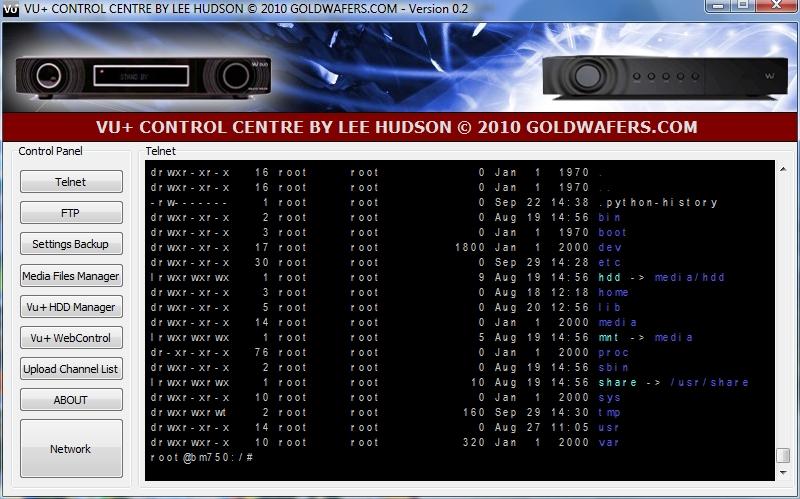
Telnet
---------
Self explanatory.
For a list of Busybox commands check out the following website:
http://www.busybox.net/downloads/BusyBox.html


FTP
----
Click the FTP Button.
This will load FileZilla FTP Client and automatically connect to your Vu+
For instructions on using FileZilla check out the following website:
http://wiki.filezilla-project.org/Using


Settings Backup
-------------------------
Click on Settings Backup Button.
Click the Backup Settings Button.
This will backup all the settings from the Vu+ to the /enigma2 and /tuxbox folders on your PC HDD.
The /enigma2 and /tuxbox folders will be located in the same folder as this program.

Click the Restore Vu+ Settings Button.
All your backup data will be restored to the /etc/enigma2 and /etc/tuxbox folders on the Vu+
Once the files have successfully been restored you'll need to reboot the receiver by powering off
and on using the switch on the back of the receiver.


Media Files Manager
---------------------------------
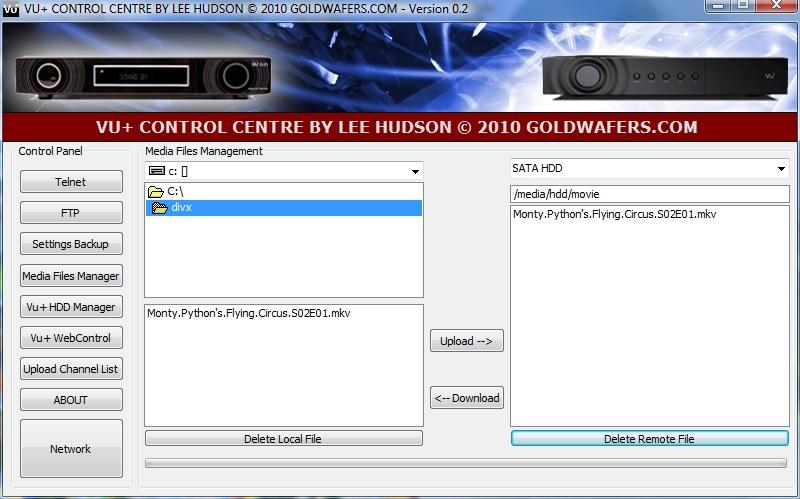
Uploading a Media File:
Select the Hard Drive and folder that contains your Media File.
Select the PVR device you have installed from the "Choose PVR Device" drop down window.
Click on the Local file you want to upload so it's highlighted in blue.
Click the Upload Button to transfer the file from your local HDD to the Vu+.

Downloading a Media File:
Select the Hard Drive and folder that you wish the file to be transferred too.
Select the PVR device you have installed from the "Choose PVR Device" drop down window.
Click on the Remote file you want to download so it's highlighted in blue.
Click the Download Button to transfer the file from the Vu+ to your local HDD.

Deleting Local File:
Select Local file so it's highlighted in blue.
Click Delete Local File Button.

Deleting Remote File:
Select remote file so it's highlighted in blue.
Click Delete Remote File Button.


Vu+ HDD Manager
------------------------------
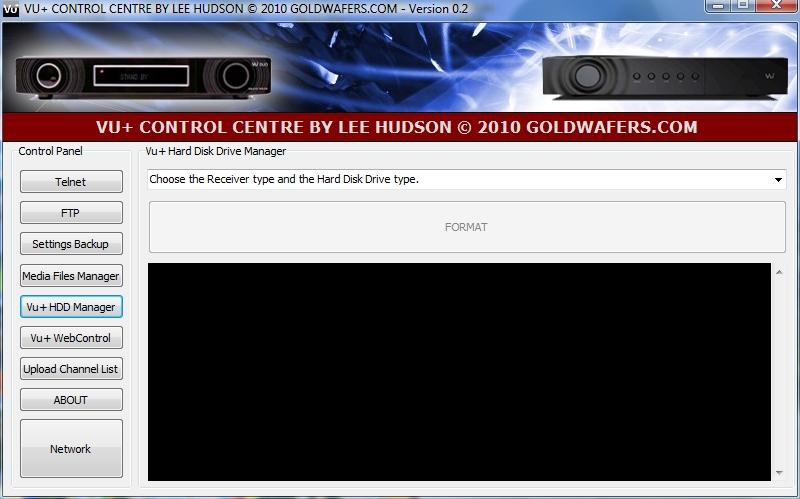
To mount and format a Hard Disk Drive do the following:
Select the receiver type and Hard Disk type.
Click the Format Button.

This will erase all the data on the Vu+ HDD.

Wait until the format has completed. It can take approx 10-15 minutes for a 1TB HDD.
You'll see a command prompt like the one below when the format has completed.

root@bm750>


Vu+ WebControl
---------------------------
Click the Vu+ WebControl Button to open Vu+ WebControl in your default web browser.


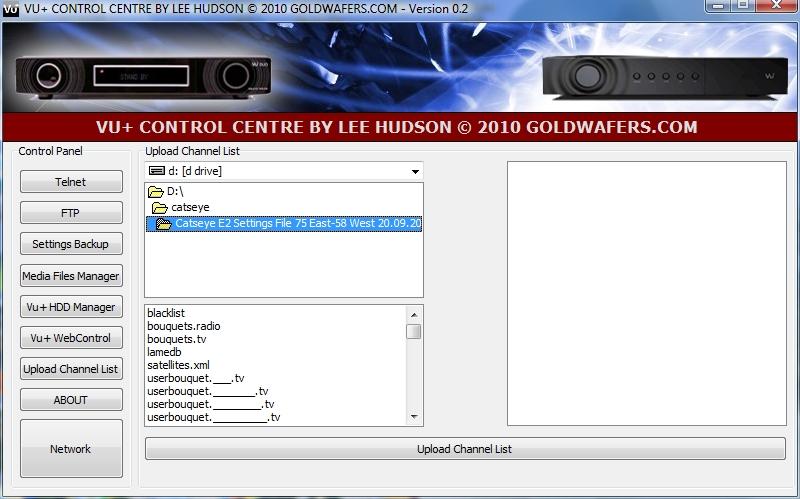
Upload Channel List
--------------------------------
Select the local directory where the Channel List is sorted.
Double click the folder to list the files.
Click the "Upload Channel List" Button.
When you see the "Channel List Uploaded! Reboot Vu+" message box appear click OK.
Now Reboot Vu+ by powering off and on.


Kind Regards

Lee.

Released 30-9-2010
 

Attachments

  • VuCC_V0.2.zip
    4.7 MB · Views: 2,954

willie martin

Vu+ Newbie
View attachment 14
View attachment 18
View attachment 17
View attachment 16
View attachment 15
VU+ Control Centre Version 0.2 Beta by Lee Hudson

--------------------------------------------------------------------------
A quick VuCC Video guide is available on Youtube
--------------------------------------------------------------------------

Installation Instructions
------------------------------------
Unzip all the files and folders in the zip file to your local hard drive.


How to Use VUCC
-----------------------------
1. Run the VUCC.exe application.
2. Enter the IP address of your Vu+ in the IP Address field, example 192.168.1.5
3. If you have changed the password on your receiver, enter the password in the password field
otherwise leave blank.
4. Click Connect Button


Telnet
---------
Self explanatory.
For a list of Busybox commands check out the following website:
http://www.busybox.net/downloads/BusyBox.html


FTP
----
Click the FTP Button.
This will load FileZilla FTP Client and automatically connect to your Vu+
For instructions on using FileZilla check out the following website:
http://wiki.filezilla-project.org/Using


Settings Backup
-------------------------
Click on Settings Backup Button.
Click the Backup Settings Button.
This will backup all the settings from the Vu+ to the /enigma2 and /tuxbox folders on your PC HDD.
The /enigma2 and /tuxbox folders will be located in the same folder as this program.

Click the Restore Vu+ Settings Button.
All your backup data will be restored to the /etc/enigma2 and /etc/tuxbox folders on the Vu+
Once the files have successfully been restored you'll need to reboot the receiver by powering off
and on using the switch on the back of the receiver.


Media Files Manager
---------------------------------
Uploading a Media File:
Select the Hard Drive and folder that contains your Media File.
Select the PVR device you have installed from the "Choose PVR Device" drop down window.
Click on the Local file you want to upload so it's highlighted in blue.
Click the Upload Button to transfer the file from your local HDD to the Vu+.

Downloading a Media File:
Select the Hard Drive and folder that you wish the file to be transferred too.
Select the PVR device you have installed from the "Choose PVR Device" drop down window.
Click on the Remote file you want to download so it's highlighted in blue.
Click the Download Button to transfer the file from the Vu+ to your local HDD.

Deleting Local File:
Select Local file so it's highlighted in blue.
Click Delete Local File Button.

Deleting Remote File:
Select remote file so it's highlighted in blue.
Click Delete Remote File Button.


Vu+ HDD Manager
------------------------------
To mount and format a Hard Disk Drive do the following:
Select the receiver type and Hard Disk type.
Click the Format Button.

This will erase all the data on the Vu+ HDD.

Wait until the format has completed. It can take approx 10-15 minutes for a 1TB HDD.
You'll see a command prompt like the one below when the format has completed.

root@bm750>


Vu+ WebControl
---------------------------
Click the Vu+ WebControl Button to open Vu+ WebControl in your default web browser.


Upload Channel List
--------------------------------
Select the local directory where the Channel List is sorted.
Double click the folder to list the files.
Click the "Upload Channel List" Button.
When you see the "Channel List Uploaded! Reboot Vu+" message box appear click OK.
Now Reboot Vu+ by powering off and on.


Kind Regards

Lee.

Released 30-9-2010
hi der im having problems wit vucc,wen i try going into web control it looks for a username and password which iv never set.any thing i can do
 

petine

Vu+ User
After downloading I did unzip all the files and folders in the zip file to my local hard drive. Then I ran the VUCC.exe application. But ..........
But why is this programme only to be opened with DOS/Windows, while the Vu+ is a 100% Linux programme ??
I am using Ubuntu/Linux.
So what do I have to do now....
 

>>Artorius<<

>>English Admin<<
After downloading I did unzip all the files and folders in the zip file to my local hard drive. Then I ran the VUCC.exe application. But ..........
But why is this programme only to be opened with DOS/Windows, while the Vu+ is a 100% Linux programme ??
I am using Ubuntu/Linux.
So what do I have to do now....
Make your own version.
 

petine

Vu+ User
But please give me the solution, because I like to install this application.

Verstuurd vanaf mijn GT-I9100P met Tapatalk
 

abdus0161

Vu+ Newbie
My vu solo 2 has got red lights does not turn on after a software update can it be repaired if i take it to a satellite store!
 

jasjas

Vu+ Newbie
I am trying out the VU+ control centre (above) but get this error:
---------------------------
Vu+ Control Centre by Lee Hudson.
---------------------------
Access violation at address 00542856 in module 'VuCC.exe'. Read of address 00000000.
---------------------------
OK
---------------------------

I am connecting to a VU+ Duo2, and have no problems with the normal web interface via Firefox. Presently I have a sudden problem connecting via FTP (Filezilla - normally fine) and thought I would try your s/w (V0.2), but only get as far as this error from a Windows 7 x64 machine. Any suggestion as to cause? Maybe the FTP problem is causing this issue?
Many thanks

JS


So sorry - looks like it was my mistake - I had a VPN client running which seemed to have blocked the FTP connection. All ok now (or at least I am connected). As ever, with all error messages ever displayed anywhere, the above "access violation" could be improved and made me think it was a more serious problem. A low priority!

Apologies, and thanks again

JS
 

Dragos

Vu+ Newbie
View attachment 14
View attachment 18
View attachment 17
View attachment 16
View attachment 15
VU+ Control Centre Version 0.2 Beta by Lee Hudson

--------------------------------------------------------------------------
A quick VuCC Video guide is available on Youtube
--------------------------------------------------------------------------

Installation Instructions
------------------------------------
Unzip all the files and folders in the zip file to your local hard drive.

thanks
How to Use VUCC
-----------------------------
1. Run the VUCC.exe application.
2. Enter the IP address of your Vu+ in the IP Address field, example 192.168.1.5
3. If you have changed the password on your receiver, enter the password in the password field
otherwise leave blank.
4. Click Connect Button


Telnet
---------
Self explanatory.
For a list of Busybox commands check out the following website:
http://www.busybox.net/downloads/BusyBox.html


FTP
----
Click the FTP Button.
This will load FileZilla FTP Client and automatically connect to your Vu+
For instructions on using FileZilla check out the following website:
http://wiki.filezilla-project.org/Using


Settings Backup
-------------------------
Click on Settings Backup Button.
Click the Backup Settings Button.
This will backup all the settings from the Vu+ to the /enigma2 and /tuxbox folders on your PC HDD.
The /enigma2 and /tuxbox folders will be located in the same folder as this program.

Click the Restore Vu+ Settings Button.
All your backup data will be restored to the /etc/enigma2 and /etc/tuxbox folders on the Vu+
Once the files have successfully been restored you'll need to reboot the receiver by powering off
and on using the switch on the back of the receiver.


Media Files Manager
---------------------------------
Uploading a Media File:
Select the Hard Drive and folder that contains your Media File.
Select the PVR device you have installed from the "Choose PVR Device" drop down window.
Click on the Local file you want to upload so it's highlighted in blue.
Click the Upload Button to transfer the file from your local HDD to the Vu+.

Downloading a Media File:
Select the Hard Drive and folder that you wish the file to be transferred too.
Select the PVR device you have installed from the "Choose PVR Device" drop down window.
Click on the Remote file you want to download so it's highlighted in blue.
Click the Download Button to transfer the file from the Vu+ to your local HDD.

Deleting Local File:
Select Local file so it's highlighted in blue.
Click Delete Local File Button.

Deleting Remote File:
Select remote file so it's highlighted in blue.
Click Delete Remote File Button.


Vu+ HDD Manager
------------------------------
To mount and format a Hard Disk Drive do the following:
Select the receiver type and Hard Disk type.
Click the Format Button.

This will erase all the data on the Vu+ HDD.

Wait until the format has completed. It can take approx 10-15 minutes for a 1TB HDD.
You'll see a command prompt like the one below when the format has completed.

root@bm750>


Vu+ WebControl
---------------------------
Click the Vu+ WebControl Button to open Vu+ WebControl in your default web browser.


Upload Channel List
--------------------------------
Select the local directory where the Channel List is sorted.
Double click the folder to list the files.
Click the "Upload Channel List" Button.
When you see the "Channel List Uploaded! Reboot Vu+" message box appear click OK.
Now Reboot Vu+ by powering off and on.


Kind Regards

Lee.

Released 30-9-2010
 
Top